Selasa, 16 Desember 2014

Differences cat5 UTP cable, Cat5e, Cat6 and CAT7

The concept of measuring the performance of a computer network cable UTP
Unit "Signal" is a standard unit of frequency [MHz]. Likewise with UTP cables, each cable networks serve as the transmission medium / media sending signals from a destination to another destination. When a network cable will be measured its transmission performance, then lan tester / lan analyzer will send a signal to a specific unit of the end of the cable, and on the other end of the cable, the receiver on lan tester will receive the signal and will measure the signal unit capacity . So with these tools we can analyze the quality of the cable.
Various categories of computer network cables are: coaxial, UTP, Fiber Optic Indoor, Outdoor Fiber Optic, multiplex.
In this article I want to narrow only to the UTP cable, UTP cables are sold in the market are generally divided into three general categories that are often used are: cat5, cat5e, cat6, and CAT7.
The difference of each category:
cat5 UTP cable: UTP cable is a standard that was created in 2001 by the TIA / EIA-568-B. Cat5 UTP cable can only transmit data at 100 Mbit / s, the maximum capacity is equal to the capacity of the ability to transmit data signal Ethernet 100BASE-TX [era 2001].
Along with the increasing need for speed, it has developed this into a cat5 UTP cable cat5e UTP cable.
Cable UTP Cat5e / Cat5e 350MHz: UTP cable is improved ability to accommodate the width of the data, and the ability to transmit data. Cat5e has a maximum speed capability of 350 MHz or equivalent to 1 Gbit / s. Besides having the ability to speed 1Gbit / s, Cat5e have very little noise when transmitting data when compared with cat5, this can be seen by the lack of response delay time when sending large data.
Cat6 UTP Cable / Cat6e: is a premium cable on the market is much more expensive than Cat5e. Cat6 has the ability delay time is almost 0 [zero] when sending the data, and also have the ability maximum cable length is more than 100 meters. Cat6 cable is a maximum of 200 meters and a maximum width of the data is 10Gbit / s.
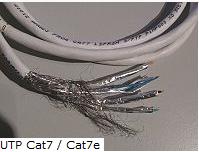
UTP cable CAT7 / cat7e: is a premium cable very suitable as a medium for the high traffic of various applications in 1 cable [single cable]. Maximum data sent is 10 Gbit / s with a frequency of 1000 MHz. Based on the spectrum analyze tools, cable length CAT7 / cat7e along 50 meters capable of transmitting signals and data at 40 Gbit / s. As for cable CAT7 / cat7e along 15 meters capable of transmitting signals and data at 100 Gbit / s.
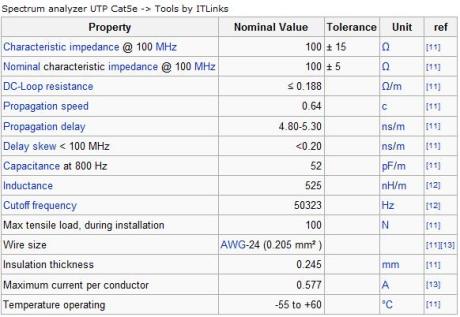
spectrum
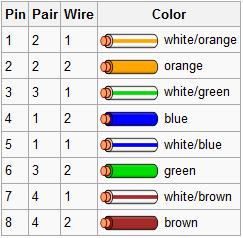
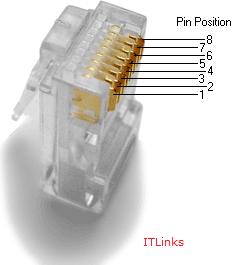
rj45pin
cat7


Perbedaan kabel UTP cat5, cat5e, cat6 dan cat7

Konsep kerja mengukur performance cable UTP jaringan komputer
Satuan “Signal” adalah suatu satuan standar dari frekuensi [ mhz ]. Begitu juga dengan kabel UTP, setiap kabel jaringan berfungsi menjadi media transmisi / media pengiriman signal dari suatu tujuan ke tujuan lain. Ketika suatu kabel jaringan akan diukur performance transmisi-nya, maka lan tester / lan analyzer akan mengirimkan suatu signal dengan satuan tertentu dari ujung kabel, dan pada ujung kabel yang lain, receiver pada lan tester akan menerima signal tersebut dan akan mengukur kapasitas satuan signal tersebut. Maka dengan alat tersebut kita dapat menganalisa kualitas kabel tersebut.
Berbagai kategori kabel jaringan komputer adalah : coaxial, UTP, Fiber Optic indoor, Fiber Optic Outdoor, Multiplek.
Pada article ini saya ingin mempersempit hanya kepada kabel UTP, kabel UTP yang terjual dipasaran pada umumnya terbagi dalam 3 kategori umum yang sering digunakan yaitu : cat5, cat5e, cat6, dan cat7.
Perbedaan dari masing-masing kategori :
kabel UTP cat5 : adalah kabel UTP dengan standar yang diciptakan pada tahun 2001 oleh TIA/EIA-568-B. Kabel UTP cat5 hanya dapat melakukan transmisi data sebesar 100 Mbit/s, kapasitas maksimum ini sama dengan kapasitas kemampuan ethernet dalam mengirimkan signal data 100BASE-TX [ era tahun 2001 ].
Seiring dengan bertambahnya kebutuhan akan kecepatan, maka telah dikembangkan kabel UTP cat5 ini menjadi kabel UTP cat5e.
Kabel UTP cat5e / cat5e 350Mhz: adalah kabel UTP yang telah ditingkatkan kemampuan menampung lebar data, maupun kemampuan mengirimkan data. Cat5e memiliki kemampuan speed maksimal 350 Mhz atau setara dengan 1 Gbit/s. Selain memiliki kemampuan speed 1Gbit/s, cat5e memiliki noise yang sangat kecil ketika mengirimkan data jika dibandingkan dengan cat5, hal ini dapat dilihat dengan minimnya waktu delay respon ketika mengirimkan data besar.
Kabel UTP cat6 / cat6e : adalah kabel premium yang di pasaran jauh lebih mahal dibandingkan dengan cat5e. Cat6 ini memiliki kemampuan waktu delay yang nyaris 0 [ nol ] ketika mengirimkan data, sekaligus memiliki kemampuan maksimal panjang kabel lebih dari 100 meter. Maksimal kabel cat6 adalah 200 meter dan maksimal lebar data adalah 10Gbit/s.
Kabel UTP cat7 / cat7e : adalah kabel premium yang sangat cocok sebagai media yang high traffic berbagai aplikasi dalam 1 kabel [ single cable ]. Maksimum data yang terkirim adalah 10 Gbit/s dengan frekuensi 1000 Mhz. Berdasarkan spectrum analyze tools, panjang kabel cat7 / cat7e sepanjang 50 meter mampu mengirimkan signal dan data sebesar 40 Gbit/s. Sedangkan untuk kabel cat7 / cat7e sepanjang 15 meter mampu mengirimkan signal dan data sebesar 100 Gbit/s.
spectrum
rj45pin
cat7

Rabu, 26 November 2014

How to Copy Locked Site

If you ever come across a website or blog can not right click or on the block to be copied article, blog or web may have been locked by the owner.

It is possible to avoid plagiarism, piracy or prevent people from copying and pasting (copy and paste) the work that he made, but if you really really want to copy it in order for the purpose of learning or the learning task you and not for piracy. (however, we have to respect other people's work as well as fruit thoughts), you'll want to also copy it to the benefit of your learning.

Here's another way to copy a site that is locked, if it can not right click on the block or by disabling javascript.

The steps are as follows:
1. Go to a blog or website that will take the title of the article and go to the article on the web address that will be copied.
2. Then block the site and copy the URL address of the site address


3. Then open Microsoft Word 2007 or Word 2010

4. Once it opens a new window Ms. Word, click the Office button and then Open (the 2007 version) or click File and then Open (the 2010 version) or press Ctrl + O.


5. In the File name copy the link that has been copied and press Open, and wait a few moments, then the web page will be moved to the word application, then you only edit or omit some parts that you do not need ....

Hopefully this way for the benefit and not for the purposes of learning and teaching that is negative! ...

Good luck ...

Cara Copy Situs Yang Terkunci

Jika Anda pernah menjumpai sebuah situs web atau blog tidak dapat di klik kanan atau di blok untuk di copy artikelnya, mungkin web atau blog tersebut telah dikunci oleh pemiliknya. 

Hal ini dimungkinkan untuk menghindari penjiplakan, pembajakan atau agar orang lain tidak mengcopy paste (kopas) karya yang dia buat, tapi jika Anda memang betul-betul ingin menyalinnya dalam rangka untuk tujuan pembelajaran atau tugas belajar Anda dan bukan untuk kepentingan pembajakan. (bagaimanapun juga kita harus menghormati juga karya orang lain sebagai buah pemikirannya), Anda tentu ingin juga menyalinnya untuk kepentingan belajar Anda.

Berikut cara lain untuk mengcopy sebuah situs yang terkunci, jika memang tidak bisa di klik kanan, di blok atau dengan cara menon-aktifkan javascriptnya.

Langkahnya sebagai berikut:
1. Buka blog atau situs yang akan diambil artikelnya dan masuklah ke judul artikel pada alamat web yang akan di copy.
2. Lalu blok alamat URL situs dan copy alamat situs tersebut


3. Setelah itu buka aplikasi Microsoft Word 2007 maupun Word 2010

4. Setelah terbuka jendela baru Ms. Word, klik Office button lalu Open (pada versi 2007) atau klik File lalu Open (pada versi 2010) atau tekan Ctrl + O.


5. Pada File name copykan link yang telah dicopy dan tekan Open, dan tunggu beberapa saat, maka halaman web tersebut akan pindah ke aplikasi word, selanjutnya Anda tinggal mengedit atau menghilangkan beberapa bagian yang menurut Anda tidak perlu….

Semoga cara ini untuk kepentingan dan keperluan pembelajaran dan bukan untuk mengajarkan yang bersifat negatif!...

Selamat mencoba...

sumber

Copy Tricks That article Wearing Anti Copy Paste Scripts

I saw a lot of blogs that install script copy and paste. Maybe they do not want the destination in a copy of their article without permission in other blogs. They put a lot of scripts that do not allow right-click, select, or even disable the view-source their blog. I never felt the difficulty and annoyance when you want to save an image directly with right click save as, open a link to a new tab using right click open new tab. I mumbled a little "Ribet Huhhh Ko script does use anti Copas all, do so can not open a new tab link etc. Kayak cave going to copy and paste the article lu wrote ". But I think maybe they want to protect them from copaser article evil. Then copy and paste the script ampuhkan?

I will explain a little bit of my opinion when visiting a blog that has anti copy and paste the script. If the blog does not allow just right click, I can just select all first, then I copy the shortcut CTRL + C for Windows and Command + C for Mac. If the blog is not mengijinjan select all with the mouse, I see the source code palingan CTRL + U / Command + U (Mozilla Firefox) or use the shortcut CTRL + A for Windows and Command A for Mac. Then when in Paste in Notepad, I took part article: D.

If the shortcut is also in nonaktifin how? I open the source code by adding the view-source: (Mozilla Firefox) before her blog address. For example, view-source: http: //www.nurulimam.com/themes/. If the view-source: also in disabling how? You can use CTRL + SHIFT + K / Commannd + Option + K to open the Default Web Console Mozilla Firefox. If you can not? It could be to keep the blog page CTRL + S / Command + S or can also click on the Edit menu bar and then Save Page As (Mozilla Firefox). If disabled, too? Try searching Tool convert Web / HTML to Doc / PDF. If not it could be? The best solution looking for people around you to manually type in the article in your blog: D.

So I think it was less potent, There are inserts article with CSS content, copy wrote tetep can see cssnya. But could we protect cssnya with php, but the article is not SEO Friendly because it is in the CSS stylesheet is not meaningful text documents like HTML. If you are looking for but do not care how powerful SEO & not want complicated coding, you can post articles only with an image where the image contains your articles as I post a source code in an image in the article Applications Online Calculator.

Trik Copy Artikel Yang Memakai Script Anti Copy Paste

Saya banyak melihat blog yang memasang script copy paste. Mungkin tujuan mereka tidak ingin artikel mereka di copy tanpa izin di blog lain. Mereka banyak memasang script yang tidak membolehkan klik kanan, select, atau bahkan ada yang menonaktifkan view-source blog mereka. Saya pernah merasa kesulitan & jengkel ketika ingin menyimpan sebuah gambar secara langsung dengan klik kanan save as, membuka link ke tab baru yang memakai klik kanan open new tab. Saya bergumam sedikit “Huhhh Ribet bener sih pake script anti copas segala, kan jadi ga bisa buka link new tab dll. Kayak gua bakalan copas artikel lu aja”. Tapi saya berfikir mungkin mereka mau melindungi artikel mereka dari copaser jahat. Lalu ampuhkan script copy paste tersebut ?
Saya akan jelaskan sedikit opini saya ketika mengunjungi blog yang mempunyai script anti copy paste. Jika blog tersebut hanya tidak mengijinkan klik kanan, saya bisa saja select all terlebih dahulu, lalu saya copy dengan shortcut CTRL + C untuk Windows & Command + C untuk Mac. Jika blog tersebut tidak mengijinjan select all dengan mouse, saya palingan lihat source codenya CTRL + U / Command + U (Mozilla Firefox) atau memakai shortcut CTRL + A untuk Windows & Command A untuk Mac. Lalu ketika di Paste di Notepad, Saya ambil bagian artikelnya :D.
Jika shortcut juga di nonaktifin bagaimana ? Saya buka source codenya dengan cara menambahkan view-source: (Mozilla Firefox) sebelum alamat blognya. Contohnya view-source:http://www.nurulimam.com/themes/. Jika view-source: juga di nonaktifkan bagaimana ? Anda bisa menggunakan CTRL + SHIFT + K / Commannd + Option + K untuk membuka Web Console Bawaan Mozilla Firefox. Jika tidak bisa ? Bisa saja dengan menyimpan halaman blog tersebut CTRL + S / Command + S atau bisa juga klik menu bar Edit lalu Save Page As (Mozilla Firefox). Jika dinonaktifkan juga ? Coba cari Tool convert Web / HTML to Doc / PDF. Jika tidak bisa juga ? Solusi terbaik cari orang disekeliling anda untuk mengetikkan artikel tersebut secara manual di blog anda :D.
Jadi menurut saya masih kurang ampuh, Ada yang menyisipkan artikel dengan CSS content, tetep aja bisa di copy lihat cssnya. Tapi bisa saja kita protect cssnya dengan php, tapi artikel tidak SEO Friendly karena berada dalam CSS yang berarti stylesheet bukan dokumen teks seperti HTML. Jika anda mencari cara ampuh tapi tidak memperdulikan SEO & Tidak mau ribet coding, anda bisa mempost artikel hanya dengan sebuah image yang mana image tersebut berisi artikel anda seperti halnya saya mempost sebuah source code dalam sebuah image di artikel Aplikasi Kalkulator Online.

EASY TO COPY PASTE IN PROTECT OR BLOG can not be copied PASTE

Maybe a lot of friends who are looking for articles, pictures, or anything on the internet, possibly for assignment, paper or fad doang.Artikel we want is already found in a website or blog and then we want to copy paste the article, ehhh suddenly can not

This time Breinhard_blog will try to share the tips and tricks to unlock protection on the web or blog tersebut.Tujuan this tutorial we created solely for the completeness of our tutorial here and not to teach something negative. If you take the positive side a lot of usefulness.

Here are some ways to use a different browser:

1. For Google Chrome browser:
2. Shortcut for Google Chrome browser, right click> select Properties.
In the textbox field Targeted file, add the -disable-java on the back of the "C: \ Documents and Settings \ Administrator.SNAKE \ Local Settings \ Application Data \ Google \ Chrome \ Application \ chrome.exe" -disable-javascript
3. Done, Please copy the article you want.
or

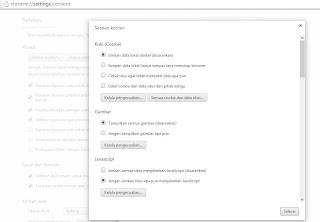
Type chrome: // settings / content in the browser url Google crome, then check the "Do not allow anything to run javascript


For Mozilla Firefox:
Select the tools menu> click option.
Select content.
Remove the check mark (unchek) the option "Enable Javascript".
Done, Please copy the article you want.
Can also be a way to disable or turn off java script program, which prevents using a right-click mozilla firefox addons, Download here. When visible message can not right click, select the check box and then click stop Right click Ok.

(update firefox version 23 and above had no javascript disabled features in the tools menu, how to turn it off by typing about: config in the browser url then disable javascript)

For the Opera browser:
Top left no option menu (red), click the Options.
Click Settings and then select Quick preference.
Uncheck the Enable JavaScript option.
Done, Please copy the article that you want

For Safari browser:
On the Edit menu.
Select Preferences menu.
On the Security menu, uncheck Enable javascript.
Done, Please copy the article you want.

For Internet Explorer browser:
Click tools> Internet Options.
Select Security and click the Custom level.
Visible Security display settings, scroll to scroll down.
Find Scripting option.
Click to disable Active Scripting, Allow paste operations via script, and scripting of Java applets and then click ok, click yes and click ok again.
Done, Please copy the article you want.
If you still can not please you closed it and re-open IE and go to a blog that would be copied.
The essence of all of the above are just disable / disable javascript feature in every browser features. When you are finished do not forget anymore Enable javascript.

CARA MUDAH COPY PASTE BLOG YANG DI PROTECT ATAU TIDAK BISA DICOPY PASTE

Mungkin banyak teman-teman yang sedang mencari artikel,gambar,atau apalah di internet, mungkin untuk tugas,makalah atau iseng-iseng doang.Artikel yang kita inginkan tersebut sudah kita temukan di suatu web atau blog lalu kita ingin mengcopy pastekan artikel tersebut,ehhh tiba-tiba tidak bisa

Kali ini Breinhard_blog akan mencoba membagikan tips dan trik membuka proteksi pada web maupun blog tersebut.Tujuan tutorial ini kami buat semata-mata untuk kelengkapan tutorial kami di sini dan bukan untuk mengajarkan sesuatu hal yang negatif. Bila kamu mengambil sisi positifnya banyak sekali kegunaannya.

Berikut beberapa cara dengan menggunakan browser yang berbeda :

Untuk browser Google Chrome:

  1. Untuk browser Google Chrome Shortcut, Klik Kanan > Pilih Properties.
  2. Pada field textbox Targeted file, tambahkan -disable-java pada bagian belakang "C:\Documents and Settings\Administrator.SNAKE\Local Settings\Application Data\Google\Chrome\Application\chrome.exe" -disable-javascript
  3. Selesai, Silahkan copy artikel yang kamu inginkan.
atau

Ketik chrome://settings/content di url browser Google crome, kemudian centang "jangan izinkan apapun menjalankan javascript


Untuk browser Mozilla Firefox:
  1. Pilih menu tools > klik option.
  2. Pilih content.
  3. Hilangkan tanda centang (unchek) pada pilihan "Enable Javascript".
  4. Selesai, Silahkan copy artikel yang kamu inginkan.
Dapat juga dengan cara men-disable atau mematikan program java script , yang mencegah klik kanan dengan menggunakan sebuah addons mozilla firefox, Unduh di sini. Bila terlihat pesan tidak dapat klik kanan, centang kotak stop Klik kanan kemudian klik Ok.

(update firefox versi 23 keatas sudah tidak ada fitur disable javascript di menu tools, cara mematikannya dengan mengetik about:config di url browser kemudian disable javascript)

Untuk browser Opera:

  1. Sebelah kiri atas ada pilihan Menu (berwarna merah), klik Pilihan tersebut.
  2. Klik settings kemudian pilih Quick preference.
  3. Hilangkan tanda centang pada pilihan Enable JavaScript.
  4. Selesai, Silahkan copy artikel yang kamu inginkan

Untuk browser safari:
  1. Pada bagian menu Edit. 
  2. Pilih menu Preferences.
  3. Pada menu Security, hilangkan tanda centang pada enable javascript
  4. Selesai, Silahkan copy artikel yang kamu inginkan.

Untuk browser Internet Explorer:
  1. Klik tools > Internet Option.
  2. Pilih Security dan klik Custom level.
  3. Terlihat tampilan Security settings, geser dengan scroll ke bawah.
  4. Cari pilihan Scripting.
  5. Klik disable pada Active Scripting, Allow Paste operations via script dan scripting of java applets lalu klik ok, klik yes dan klik ok lagi.
  6. Selesai, Silahkan copy artikel yang kamu inginkan.
  7. Jika masih tidak bisa, silahkan kamu tutup IE nya lalu buka lagi dan kunjungi blog yang mau di-copy.
    Inti dari semua cara di atas yaitu hanya menonaktifkan/disable fitur javascript di setiap fitur browser. Bila sudah selesai jangan lupa di Enable lagi javascriptnya.
    sumber

    Rabu, 04 Juni 2014

    6 Cara Meningkatkan Daya Ingat Anda


    daya ingat
    Ada berbagai cara untuk meningkatkan daya ingat. Ingatan kita layaknya organ tubuh yang lain yang membutuhkan latihan teratur agar selalu dalam kondisi baik, sebagaimana juga atlet harus melatih tubuhnya untuk menghadapi masa-masa yang sulit. Daya ingat memerlukan pelatihan khusus agar tetap dalam kondisi prima dan kemampuannya meningkat. Ada beberapa cara sederhana, yang dapat anda ikuti untuk menjaga daya ingat anda tetap dalam kondisi prima, dan juga teknik yang benar-benar dapat membantu anda memperbaiki kondisi dan kinerja daya ingat anda.

    Penyebab-penyebab Berkurangnya Daya Ingat

    Kualitas daya ingat seseorang tidak hanya tergantung pada pendidikan, lingkungan belajar dan lingkungan fisik di mana ia hidup, tetapi juga pada faktor-faktor lain yang dapat mempengaruhi hidupnya (misalnya kehilangan orang yang dicintai). Ada juga faktor genetik keturunan yang memainkan peran yang sangat penting. Penyebab yang lain adalah:
    Tidur
    Ada hubungan langsung antara kurang tidur, insomnia dan berkurangnya daya ingat.
    Tidur malam yang cukup sangat penting bagi berfungsinya ingatan kita. Penelitian telah menunjukkan bahwa dibutuhkan setidaknya 6 jam tidur untuk daya ingat berfungsi pada potensi maksimumnya.
    Sangat penting untuk tidak mengabaikan persyaratan tidur untuk tubuh kita. Jika kita mendapatkan cukup tidur, maka bukan hanya daya ingat saja menjadi lebih baik tetapi kita juga akan lebih mampu mengatasi stres sehari-hari.
    Depresi
    Depresi merupakan penyebab yang melemahkan daya ingat.
    Depresi saat ini telah menjadi penyakit yang sangat umum. Hal ini dapat terjadi pada semua usia. Ada banyak penyebab yang dapat menyebabkan depresi. Peristiwa-peristiwa yang sangat serius yang melukai jiwa manusia, seperti kehilangan orang yang dicintai, biasanya disertai dengan depresi dan menyebabkan penurunan daya ingat.
    Dalam kasus depresi, penting untuk mencari bantuan dan nasehat dari dokter berkualitas. Obat depresi yang tepat memungkinkan untuk pemulihan penuh daya ingat.
    Penyakit tiroid
    Penyakit kelenjar tiroid mempengaruhi sejumlah besar orang, dan memiliki efek negatif pada daya ingat.
    Diagnosis awal penyakit tiroid akan mencegah kerusakan lebih lanjut dari daya ingat. Penyakit kelenjar tiroid dapat terjadi pada semua usia.
    Diabetes
    Diabetes telah menjadi bencana yang cukup menakutkan di dunia. Banyak pasien tidak mengobati diabetes dengan baik. Kegagalan sistem vaskular yang terus berlanjut pada diabetes dan tidak diobati secara efektif berkontribusi terhadap menurunnya daya ingat.
    Pengobatan yang tepat dan pengendalian terhadap diabetes akan meningkatkan daya ingat. Penyakit kronis lainnya seperti pada hati, paru-paru dan ginjal juga mempengaruhi daya ingat. Dalam kasus diagnosa secara dini dan dilanjutkan dengan pengobatan akan memperbaiki daya ingat dan mencegah kerusakan lebih lanjut.
    Alkohol dan obat-obatan
    Kecanduan alkohol dan beberapa jenis obat-obatan tertentu, dapat menyebabkan penurunan daya ingat atau bahkan degenerasi kemampuan intelektual lainnya.
    Para pecandu alkohol pada awalnya memiliki masalah dengan daya ingat jangka pendek, kemudian amnesia ini diperparah dengan masalah dengan daya ingat jangka panjang.
    Konsumsi alkohol sekala sedang (1 sampai 2 gelas untuk laki-laki dan 1 gelas untuk wanita, setiap hari), tidak membahayakan otak. Sebaliknya konsumsi alkohol yang berlebihan adalah racun bagi otak dan daya ingat.
    Obat-obatan dapat membahayakan otak dan mengurangi kemampuan mental. Misalnya obat ekstasi menyebabkan kerusakan serius pada daya ingat.
    Kurangnya Vitamin B12
    Kurangnya vitamin tertentu juga dapat menyebabkan penurunan daya ingat. Vitamin B12 diperlukan bagi otak agar dapat berfungsi maksimal. Diet yang seimbang memberikan tubuh vitamin dan mineral yang dibutuhkan.
    Vitamin B12 ditemukan pada ikan, telur, daging, unggas, susu dan produk susu. Vitamin ini membantu sistem peredaran darah dan kesehatan otak.

    6 Cara Meningkatkan Daya Ingat Anda

    Seperti telah disebutkan diatas bahwa ingatan kita layaknya seorang atlet. Semakin anda melatih otak dan daya ingat maka semakin baik juga kinerja mereka. Pepatah “practice makes perfect” berlaku bagi daya ingat kita juga. Selain faktor-faktor yang dapat menyebabkan penurunan daya ingat (seperti dijelaskan di atas), ada beberapa cara yang dapat diadopsi untuk meningkatkan daya ingat anda. Yang terpenting adalah yang disebutkan di bawah ini:
    1. Jangan pernah berhenti belajar
    Carilah topik yang menarik minat anda dan mulailah terlibat didalamnya dengan mempelajari informasi-informasi baru dan perkembangan tentang topik tersebut. Jika memungkinkan, anda dapat bergabung dengan kelompok yang memiliki minat yang sama dengan anda untuk berdiskusi dengan orang-orang dalam kelompok tersebut.
    Membaca, mengikuti kuliah, program, informasi di televisi dan internet, merupakan sumber pendidikan berkelanjutan untuk otak anda yang tentu saja akan mendatangkan hasil yang bermanfaat untuk perkembangan daya ingat anda.
    2. Menjalin hubungan sosial dan keluarga anda
    Manusia pada dasarnya memiliki keramahan yang melekat. Semakin sosial anda, semakin baik untuk otak anda. Mengisolasi diri akan merusak banyak sistem tubuh. Penelitian telah menunjukkan bahwa otak dan jantung memiliki banyak keuntungan hubungan keluargadan sosial yang baik.
    Sehubungan dengan konteks ini, anda bisa menjadi relawan untuk memberikan bantuan dimana masyarakat membutuhkan anda, atau bahkan berpartisipasi dalam kelompok terorganisir, yang sesuai dengan kepentingan anda sendiri. Jika anda memiliki hewan peliharaan misalnya, anda dapat bersosialisasi dengan orang lain yang juga memiliki hewan peliharaan dan mendiskusikan dengan mereka masalah yang relevan serta mengembangkan hubungan yang lebih erat.
    3. Mengembangkan kebiasaan baru
    Setiap kali anda mengharuskan pada diri sendiri untuk melakukan sesuatu yang baru, anda berarti memicu kekuatan baru untuk mencapai tujuan yang telah ditetapkan.
    Pertimbangkan untuk merubah layout mebel anda, mengoleskan mentega pada roti dengan cara yang berbeda atau dengan mata tertutup, mengenakan celana dengan satu tangan, atau belajar menggunakan mouse dengan tangan yang lain. Anda dapat memikirkan beberapa ide lain untuk melatih otak dan membantu meningkatkan daya ingat anda.
    4. Latih pikiran anda dengan permainan-permainan.
    Semakin anda menggunakan keistimewaan otak, semakin anda membantu daya ingat anda tetap bugar. Ada banyak permainan yang membangkitkan kemampuan intelektual anda, sekaligus juga berkontribusi untuk hubungan sosial yang lebih baik. Backgammon, catur, teka-teki dan banyak permainan papan lainnya, menawarkan hiburan dan juga membantu anda meningkatkan daya ingat.
    5. Olahraga dapat meningkatkan daya ingat anda
    Olahraga meningkatkan sistem peredaran darah. Bahkan latihan sehari-hari yang sederhana tapi rutin seperti berjalan cepat dapat meningkatkan kinerja jantung dan oksigenasi otak. Tidak perlu menjadi seorang pelari maraton dalam rangka memperoleh manfaat dari berolahraga. Manfaat olahraga berpengaruh positif pada banyak sistem tubuh, khususnya daya ingat dan kemampuan kognitif lainnya. Cukup dengan berolahraga selama 20 menit setiap hari dalam latihan yang sederhana seperti berjalan kaki, bersepeda atau berenang.
    Terbukti secara ilmiah bahwa berjalan kaki selama 2,5 jam setiap minggu secara substansial akan meningkatkan daya ingat pada orang-orang di atas usia 50 tahun.
    6. Makanan yang akan membantu meningkatkan daya ingat anda
    Apa yang kita makan setiap hari, mempengaruhi kinerja dan kondisi daya ingat kita dalam jangka panjang. Survei dalam beberapa dekade terakhir, telah menunjukkan bahwa makanan tertentu dapat berkontribusi untuk meningkatkan fungsi sirkuit saraf dari otak yang mengontrol daya ingat.
    Ciri-ciri umum dari makanan ini adalah mereka kaya akan antioksidan dan vitamin yang bermanfaat bagi sistem saraf.
    Ingatlah bahwa untuk mendapatkan asupan vitamin yang cukup dalam tubuh anda, lebih baik untuk makan lebih banyak buah dan sayuran daripada menelan vitamin formulasi. Alasannya adalah dengan mengonsumsi makanan kaya vitamin anda juga menyerap nutrisi yang berguna lainnya yang bertindak untuk melengkapi dan mendukung kerja vitamin.
    Beberapa makanan yang bisa meningkatkan daya ingat anda adalah:
    1. Sayuran berdaun hijau, bayam, kubis, selada
    2. Brokoli dan kembang kol
    3. Jus buah, buah
    4. Berbagai macam berry, buah delima
    5. Kacang-kacangan
    6. Ikan berlemak seperti salmon, sarden, mackerel
    7. Minyak zaitun dan minyak nabati lainnya

    Rabu, 28 Mei 2014

    Managing Remote Print Servers


    In the previous chapter it was stated that the Print Management tool provides a central location from which the print services for an entire network may be managed. So far we have only looked and managing the print server running on the local computer. In this section we will look at adding remote servers to the local Print Management configuration. For the purposes of this example a theoretical configuration consisting of two Windows Server 2008 systems named winserver-1 and winserver-2 is assumed. Both systems have the print services role installed and Print Management on winserver-1 will be configured to also manage print services on winserver-2. This is achieved by first launching Print Management on the local winserver-1 system (Start -> Administration Tools -> Print Management), right clicking on the Print Servers node of the tree hierarchy in the left hand pane and selecting the Add/Remove Servers option.
    From the resulting menu, select the Add/Remove Servers option. The resulting dialog box displays the currently configured print servers under the management of local Print Management. If no remote print servers have been added previously the only server listed will be the local system. To add additional print servers either enter a comma separated list of server names, or use the Browsebutton to locate servers on the network. When one or more servers have been selected, click on the Add to list button to add the servers to the list. The following figure illustrates the Add/Remove Servers dialog box configured with both the local and remote servers:

    Adding remote print servers to Print Management Console

    Once all the required remote print servers have been added to the list, click on Apply then close the dialog to return to the main Print Management window. The new print servers will now appear alongside the local server under Print Servers in the left hand pane of the Print Management screen as illustrated below:


    Managing multiple print servers on Windows Server 2008

    Migrating Printers and Queues Between Servers

    Windows Server 2008 also provides the ability to migrate both printers and print queues from one print server to another. This makes it easy, for example, to take a print server off-line for maintenance or to permanently re-assign a printer from one print server to another. The steps outlined below assume that print Management has been configured to manage both the source and target print servers as outlined in the preceding section of this chapter. If this is not the case, the printer export file will need to be copied onto the destination server or made available via file sharing and imported using Print Management on that server.
    This form of migration is performed using the Printer Migration Wizard which, along with most other tasks, is accessed from the Print Management interface. Once Print Management is up and running, right click on the server in the left pane from which the printer is to be migrated (the source server) and select Export Printers To a File from the menu. Print Management will subsequently display a dialog listing the printer drivers, port and queues currently configured on the selected print server as illustrated below:

    List of printers to be exported prior to migration


    After reviewing the listed information click Next and select a suitable location to save the printer export file and click Next once again to perform the export process. Depending on the number of printers being exported and the size of the drivers the export process may take a few minutes to complete. If the export was successful a message will appear beneath the progress bar stating this fact. If the export was unsuccessful, click on the Open Event Viewer button provided to learn more about the cause of the problem so that remedial action may be taken. Assuming a successful export click Finish to dismiss the Printer Migration dialog.

    The next step is to import the printers into the target server. Begin by right clicking on the destination server in the Print Management window and selecting Import printers from a file.... In the resulting dialog, use the browse button to navigate to the export file, select it and click on Next to proceed. Once the file has been read a screen will appear identical to the one displayed prior to exporting the printer objects in the preceding step. Review this information and click Next to display the Select import options screen as illustrated in the following figure:

    Selecting the printer import options


    These options require a little explanation:

    • Keep existing printers; import copies - It is possible that a printer being imported is already also installed on the destination server. With this option selected, the original printer on the destination server will be left unchanged and the new printer imported as a copy.
    • Overwrite existing printers - If the printer being imported is already installed on the target server it is overwritten by the imported copy when this option is selected.
    • List printers that were previously listed - When selected, only printers that were already listed in Active Directory will still be listed after the import process is completed.
    • List all printers - All printers are listed in Active Directory
    • Don't list any printers - No printers are listed in Active Directory
    Once the required settings are configured, click Next to initiate the printer import process. The printer configurations, drivers and queues will be subsequently be imported onto the target print server. If errors are reported click on the Open Event Viewer button to obtain additional information. In particular, be mindful of printers that were physically connected to the source print server. Since they are not physically connected to the target server an error will likely occur during the migration. Even if the printer was physically moved to the target system prior to migration it is also possible that it is connected to a different physical port to that used on the source server. Such problems can be resolved by right clicking on the imported printer in Print Management, selecting Properties and making the necessary configuration changes.

    Configuring Printer Permissions

    Access to printers is controlled through the configuration of printer permissions. By default, a printer is accessible to all users on the local system, and if shared, all users elsewhere on the network. Printer permissions are divided into two categories, special permissions and standard permissions. Before describing how to change the permissions on a printer it is first important to understand the meaning of each permission option.
    The standard printer permissions are outlined in the following table:
    PermissionDescription
    PrintAllows users and groups to send documents to the printer and to manage their own print jobs. Also includes the Read special permission allowing viewing, but not alteration, of printer permissions
    Manage PrintersAllows full management of the printer, including changing shared status, changing of permissions and properties, taking ownership of printers and print jobs and starting and stopping print jobs. Includes the ReadChange and Take Ownership special permissions.
    Manage DocumentsAllows user and groups to manage print jobs but does not provide the ability to print. Permissions consist of pausing, restarting, resuming and reordering and canceling print jobs. Includes the ReadChange and Take Ownership special permissions
    The special permissions are as follows:
    PermissionDescription
    Read PermissionsUser or Group may view the permissions on the printer.
    Change PermissionsUser or Group may change the permissions of a printer.
    Take OwnershipUser or Group may take ownership of printer and/or print jobs.
    The current permissions for a printer may be viewed and changed by right clicking on that printer in the Print Management tool (Start -> Administrative Tools -> Print Management), selectingProperties and clicking on the Security tab:

    Windows Server Printer permissions


    To change the permissions for a currently listed user or group, select the user or group and change the Allow and Deny permissions to the required settings. When the settings are configured, click on apply to commit the changes. If the user or group is not currently listed in the properties dialog, click on the Add... button to invoke the Select Users or Groups dialog. Change the Location setting if necessary and then enter the names of the users or groups, separated by semi-colons into the bottom text box. Click the Check Names button to verify the selected users or groups exist within the current location scope:


    Selecting users and groups


    Assuming the names are correct click on OK to return to the properties dialog where the selected users and/or groups will now be included in the Group or user names list. To configure permissions, select a user or group and set the permissions in the Permissions for section of the dialog. Click Apply to commit the changes and repeat the task for any other users or groups added to the list.

    To configure the special permissions click on the Advanced button in the Security page of the properties panel to display the Advanced Security Settings dialog as illustrated below:

    Advanced Printer Security Settings


    To modify the permissions for a user or group select that object from the list and click Edit... to display the Permission Entry for dialog. In this dialog both the standard and special permissions for the selected user or group are displayed and may be changed as required. As noted previously, certain special permissions are implicit in standard permission settings. For example, setting theManage Printers standard permission also enables the ReadChange and Take Ownership special permissions. Once the desired permission changes have been made click on OK to dismiss thePermission Entry for dialog, followed by Apply, then OK in the Advanced Security Settings dialog. Finally, click on OK to dismiss the properties dialog and return to Print Management.

    Changing Printer Ownership

    After a printer has been installed the owner, by default, is SYSTEM. Ownership may be taken either by an administrator or by a user or group which has been assigned Take ownership permission for the printer.
    To assign ownership to another user or group, open the properties dialog for the printer, select the Security tab and then click on Advanced. In the advanced settings screen, select the Owner tab. This screen will list the current owner, together with a list of users and group to which ownership may be changed. If the intended new owner is not listed in the Change owner to: list, click on theOther users or groups... button to access the Select User or Group dialog box. Enter the name of a user or group and click on the Check Names button. With the correct name selected, click on OKto return to the list of owners. Select the desired owner from the list and click on Apply to commit the change of ownership.

    Printer Pooling Configuration

    Printer Pooling refers to the process of allocating multiple physical print devices to a single logical printer. In such a configuration print jobs to the logical printer are assigned by the print server to the first available physical printer in the pool. A key requirement is that the physical printers that make up a pool must all use the same print driver and have the same amount of memory.
    To configure printer pooling, install a printer such that it uses a particular port (such as a local port or IP address). Attach the other printers that are to make up the pool, but do not install them via Print Management. Once the first printer is installed, open the properties dialog for that printer by right clicking on it in Print Management and select the Ports tab. In the Ports page select theEnable printer pooling option. If the ports to which the additional printers are connected are listed make sure they are all selected. Note that a pool can be made up of printers connected in any combination of ways (network, serial, parallel, USB etc). In the case of network printers, click on Add Port... and enter the IP address of the additional printer, click New Port... and allow the wizard to create the new port. Once all the new ports are added and selected, click Apply to create the printer pool. The following figure illustrates a printer pool comprising three HP Deskjet network printers:

    Configuring a Windows Printer Pool


    Configuring Printer Availability and Priority

    Rather than working with the actual physical printers, users are in fact working with logical printers which map onto a physical print device. Windows allows a single physical print device to be assigned to multiple logical printers. This approach brings considerable flexibility in terms of controlling the availability of a printer to different groups of users and the priority of their print jobs.
    This concept is best described by example. Suppose that a printer is to be made available to members of an engineering group only during the office hours. That same printer, however, is to always be available to the management group. Similarly, any print jobs belonging to the management group must be given a higher priority than those of the engineering group. To achieve this objective, two logical printers assigned to the same physical print device will be created, one for engineering and one for management. The availability of the engineering logical printer will be restricted to office hours and given a low priority. The management logical printer will always be available and will be given a high priority. Permissions on the logical printers will then be configured such that the engineering team is denied access to the management printer.
    Availability and priority is configured from the printer property panel. To access these settings, launch Print Management and navigate to the required printer in the left pane. Right click on the printer, select Properties and then choose the Advanced tab. Once selected, the property panel will appear as follows:

    Configuring printer priority and availability


    For the management logical printer the Always available option will be selected and a high priority assigned (for example 95). Once these values are set, click on the Security tab of the properties dialog and deny access to the printer for the engineering group. Repeat these steps for the engineering logical printer, this time selecting the Available from option and specifying the hours that the printer is available.